
The Ultimate Game-Day Disaster That Changed Everything
Picture this: It’s Sunday afternoon, your living room is packed with friends ready to watch the big game, and you just realized you forgot to order appetizers. Sound familiar? This exact scenario happened to me last month, and instead of panicking (okay, maybe I panicked a little), I rifled through my pantry and discovered the magic of homemade cheesy breadsticks.
What started as a desperate attempt to feed hungry guests turned into the most requested recipe in my household. These aren’t just any breadsticks – they’re crispy on the outside, perfectly chewy on the inside, and loaded with enough cheese to make your taste buds do a happy dance. The best part? They take less time to make than it would take for delivery to arrive, and they taste infinitely better than anything you’d get from a restaurant.
If you’re looking for easy appetizers that will have everyone asking for the recipe, you’ve found your new secret weapon. These cheesy breadsticks are about to become your go-to solution for unexpected guests, potluck contributions, or those moments when you just need comfort food that delivers.
Ingredients You’ll Need
For the Dough:
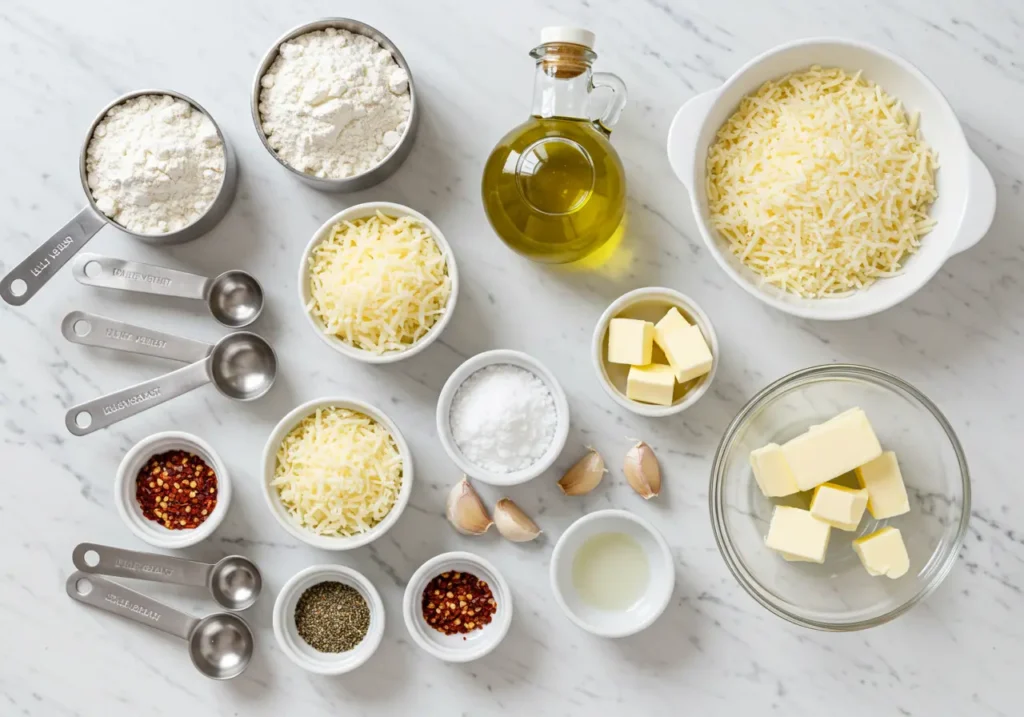
- 2 cups all-purpose flour
- 1 tablespoon sugar
- 1 teaspoon salt
- 1 packet (2¼ teaspoons) active dry yeast
- ¾ cup warm water (110°F)
- 2 tablespoons olive oil
For the Cheese Topping:
- 1½ cups shredded mozzarella cheese
- ½ cup grated Parmesan cheese
- 2 tablespoons butter, melted
- 2 cloves garlic, minced
- 1 teaspoon Italian seasoning
- ½ teaspoon garlic powder
- ¼ teaspoon red pepper flakes (optional)
- Fresh parsley for garnish
For Serving:
- 1 cup marinara sauce, warmed
- Extra Parmesan cheese for sprinkling
Prep Time: 15 minutes (plus 1 hour rising time)
Cook Time: 12-15 minutes
Total Time: 1 hour 30 minutes
Servings: 12-16 breadsticks
Step-by-Step Instructions
Step 1: Activate the Yeast
Start by combining the warm water and sugar in a large mixing bowl. The water should feel comfortably warm on your wrist – not hot enough to kill the yeast, but warm enough to activate it. Sprinkle the yeast over the water and let it sit for 5-10 minutes until it becomes foamy. This foamy layer tells you the yeast is alive and ready to work its magic.
Pro tip: If your yeast doesn’t foam, it might be expired or the water was too hot. Start over with fresh yeast and slightly cooler water.
Step 2: Make the Dough
Add the olive oil to your foamy yeast mixture, then gradually stir in the flour and salt. Mix until a soft dough forms. If the dough seems too sticky, add flour one tablespoon at a time. If it’s too dry, add warm water one teaspoon at a time. The perfect dough should be slightly tacky but not sticky enough to cling to your hands.

Step 3: Knead and Rise
Turn the dough onto a lightly floured surface and knead for 6-8 minutes until it’s smooth and elastic. You’ll know it’s ready when you can stretch a small piece thin enough to see light through it without tearing. Place the dough in a greased bowl, cover with a damp towel, and let it rise in a warm place for 1 hour or until doubled in size.
Step 4: Prepare the Cheese Mixture
While the dough rises, combine the melted butter, minced garlic, Italian seasoning, garlic powder, and red pepper flakes in a small bowl. In a separate bowl, mix the mozzarella and Parmesan cheeses. Having everything ready makes assembly much smoother.
Step 5: Shape the Breadsticks
Preheat your oven to 450°F and line a large baking sheet with parchment paper. Punch down the risen dough and roll it into a 12×8-inch rectangle on a floured surface. Using a pizza cutter or sharp knife, cut the dough into 12-16 strips, depending on how thick you want your breadsticks.
Step 6: Add the Toppings
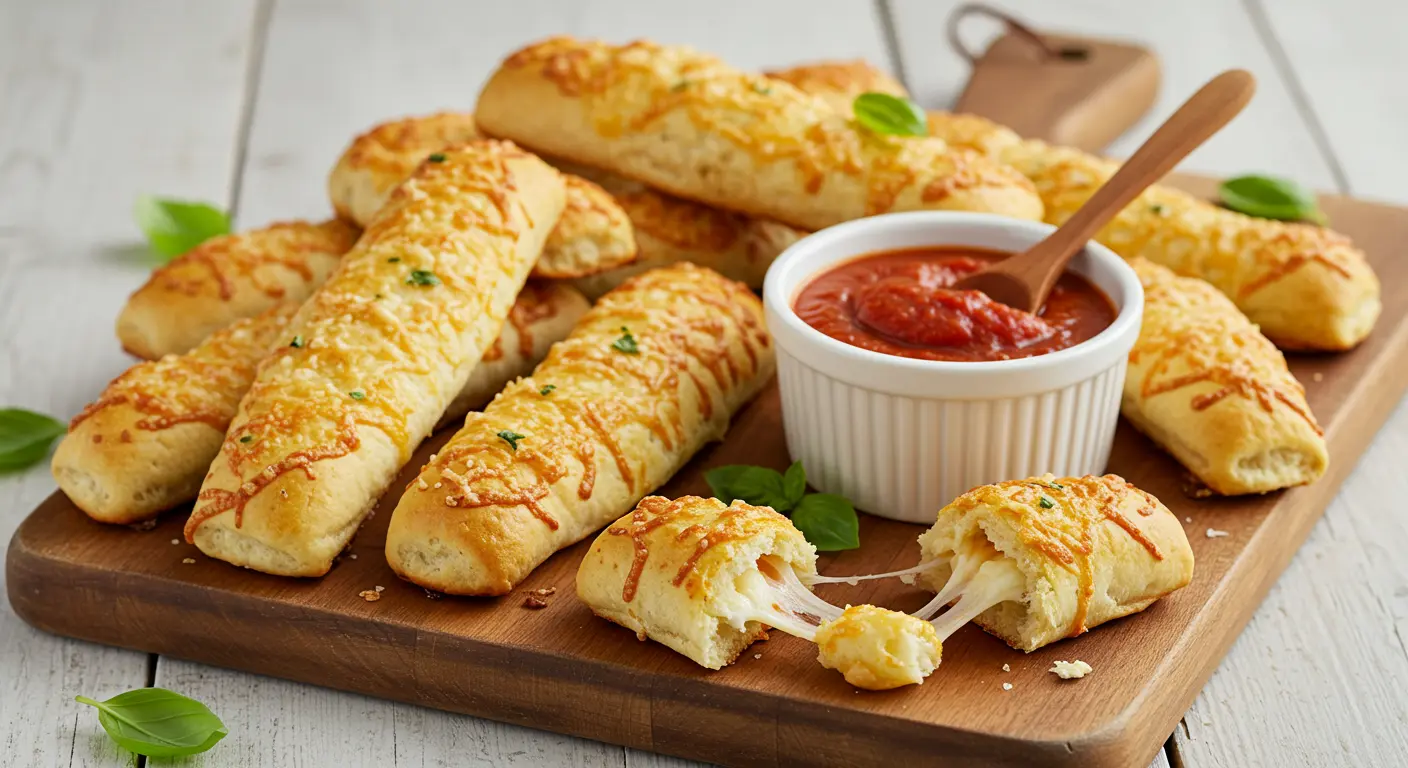
Brush each breadstick with the garlic butter mixture, making sure to get into all the nooks and crannies. Generously sprinkle the cheese mixture over each breadstick, pressing gently to help it adhere. Don’t be shy with the cheese – it’s what makes these breadsticks legendary!
Step 7: Bake to Golden Perfection
Bake for 12-15 minutes, or until the breadsticks are golden brown and the cheese is bubbly and slightly crispy on top. The internal temperature should reach 190°F if you want to be precise. Remove from the oven and immediately sprinkle with fresh parsley for a pop of color and freshness.
Step 8: Serve and Enjoy
Let the breadsticks cool for 2-3 minutes before serving – the cheese will be molten hot right out of the oven. Serve with warm marinara sauce for dipping and watch them disappear faster than you can say “seconds, please!”
Tips & Variations for Perfect Breadsticks
Pro Tips for Success:
- Temperature matters: Use a kitchen thermometer to ensure your water is the right temperature for yeast activation
- Don’t skip the rise: Proper rising time creates the perfect texture – resist the urge to rush
- Cheese distribution: Spread cheese all the way to the edges to prevent bare spots
- Perfect timing: Bake until golden but not dark brown for the best texture
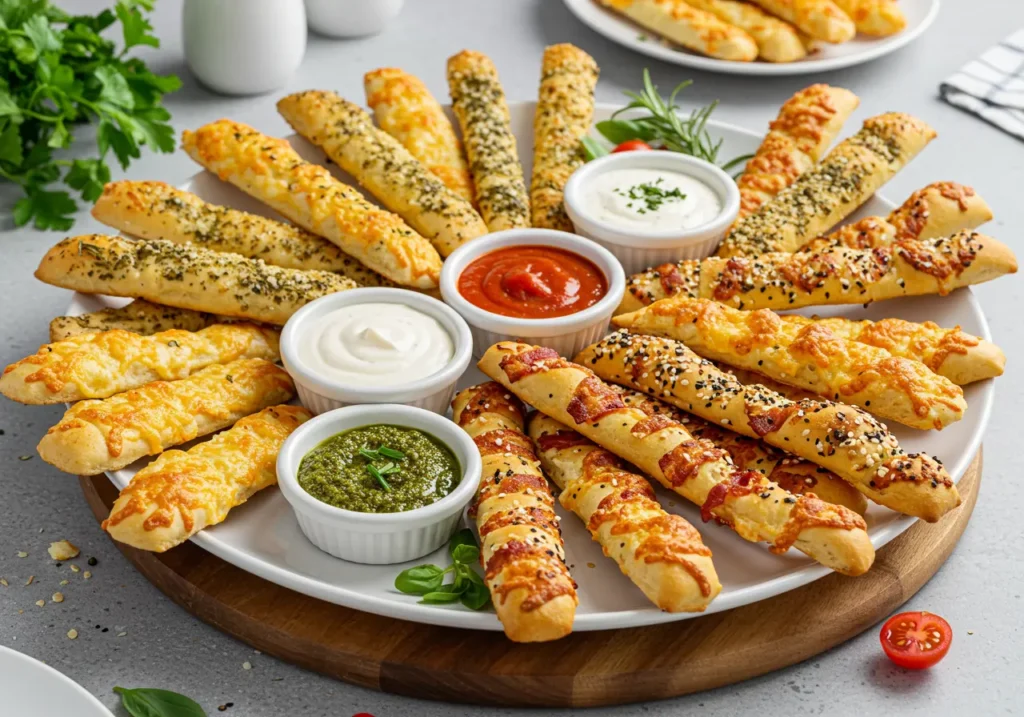
Flavor Variations:
Herb Lovers: Add fresh rosemary, thyme, or oregano to the dough for an aromatic twist Spicy Kick: Increase red pepper flakes or add a pinch of cayenne to the cheese mixture Everything Bagel: Top with everything bagel seasoning before baking Bacon Lovers: Sprinkle crispy bacon bits over the cheese before baking
Dietary Modifications:
Gluten-Free: Substitute with a quality gluten-free flour blend (add 1 teaspoon xanthan gum if not included) Dairy-Free: Use dairy-free cheese alternatives and olive oil instead of butter Whole Wheat: Replace half the all-purpose flour with whole wheat flour for added nutrition Low-Carb: Try using cauliflower-based dough for a lighter alternative
Make-Ahead Magic:
These breadsticks are perfect for meal prep! You can prepare the dough through step 5, cover tightly, and refrigerate for up to 24 hours. Just bring to room temperature before adding toppings and baking. You can also freeze unbaked breadsticks for up to 3 months – just add 2-3 extra minutes to the baking time.
Storage & Reheating Instructions
Storing Leftover Breadsticks:
Store cooled breadsticks in an airtight container at room temperature for up to 3 days. For longer storage, wrap individually in plastic wrap and freeze for up to 3 months. Label with the date to keep track of freshness.
Reheating Methods:
Oven Method (best for crispiness): Preheat oven to 350°F, place breadsticks on a baking sheet, and warm for 5-7 minutes until heated through and crispy.
Microwave Method (quick but softer): Place on a microwave-safe plate and heat for 20-30 seconds. Add a damp paper towel over them to prevent drying out.
Toaster Oven Method: Perfect for small batches – toast for 3-4 minutes until warmed and slightly crispy.
Air Fryer Method: Heat at 350°F for 2-3 minutes for perfectly crispy results.
Frequently Asked Questions
Can I make these breadsticks without yeast?
While yeast creates the perfect texture, you can make a quick version using 2 teaspoons of baking powder instead of yeast. Skip the rising time and bake immediately. The texture will be more like a biscuit than traditional breadstick, but still delicious!
Why didn’t my breadsticks rise properly?
The most common culprits are expired yeast, water that was too hot (which kills yeast), or a too-cool environment for rising. Make sure your yeast is fresh and your water temperature is around 110°F – it should feel warm but not hot on your wrist.
Can I use different types of cheese?
Absolutely! While mozzarella and Parmesan create the classic flavor, you can experiment with cheddar, provolone, or even pepper jack for a spicy kick. Just keep the total amount of cheese the same for best results.
How do I know when the breadsticks are done?
Look for a golden-brown color and bubbly, slightly crispy cheese. The internal temperature should reach 190°F if you want to be precise. They should sound hollow when tapped on the bottom.
Can I make these ahead for a party?
Yes! You can prepare the dough and shape the breadsticks up to 24 hours ahead. Cover and refrigerate, then bring to room temperature before adding toppings and baking. You can also freeze unbaked breadsticks for up to 3 months.
What’s the best way to reheat leftover breadsticks?
For the crispiest results, reheat in a 350°F oven for 5-7 minutes. The microwave works for quick reheating but won’t maintain the crispy exterior.
Can I make these breadsticks dairy-free?
Yes! Use dairy-free cheese alternatives and replace the butter with olive oil. The flavor will be slightly different, but they’ll still be delicious and crispy.
Nutritional Highlights
Each breadstick provides a satisfying balance of carbohydrates and protein, making them more substantial than typical appetizers. The cheese provides calcium and protein, while the herbs add antioxidants. When served with marinara sauce, you’re also getting a serving of vegetables and lycopene from the tomatoes.
For lighter options, you can reduce the cheese by half or use part-skim mozzarella without significantly impacting the flavor. These breadsticks are also naturally vegetarian and can easily be made vegan with dairy-free substitutions.
Perfect Pairings and Serving Suggestions
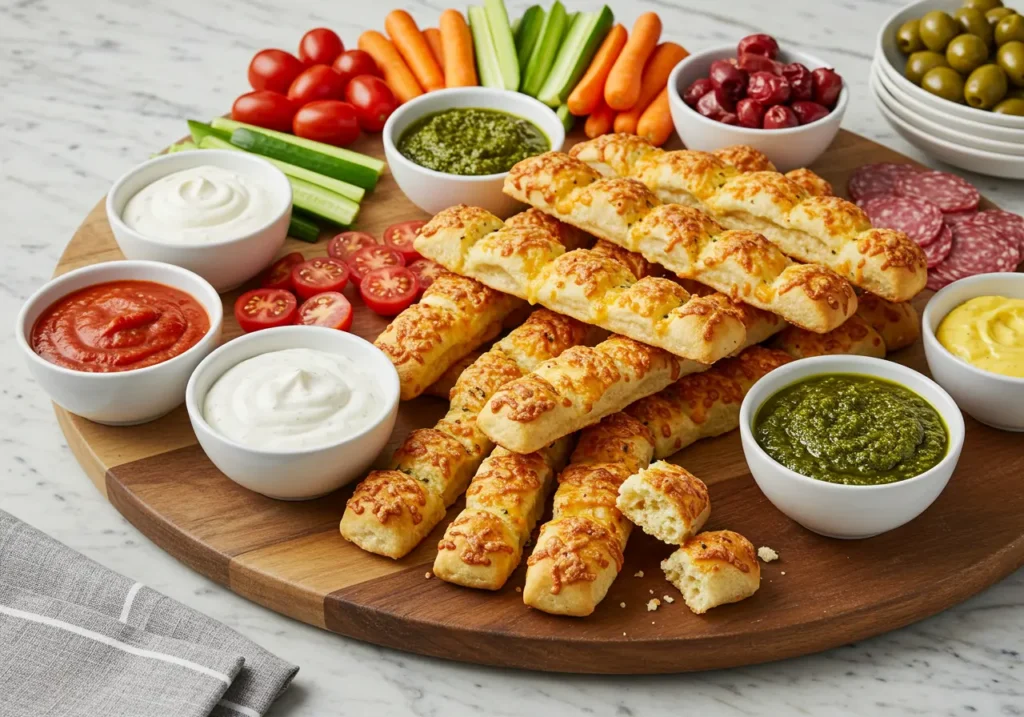
These cheesy breadsticks are incredibly versatile and pair beautifully with numerous dishes. Serve them alongside your favorite pasta dishes, soups, or salads. They’re particularly amazing with:
- Classic marinara sauce (the traditional favorite)
- Garlic butter dipping sauce
- Ranch dressing for a crowd-pleasing combination
- Pesto for an Italian-inspired twist
- Warm pizza sauce for that authentic pizzeria experience
For entertaining, arrange them on a wooden board with several dipping sauces, fresh vegetables, and maybe some cured meats for a complete appetizer spread. They’re also fantastic as part of a game-day menu alongside wings, sliders, and other finger foods.
How to Make Hawaiian Roll Hamburger Sliders in 15 Minutes
Seasonal Serving Ideas
These breadsticks shine year-round but can be customized for different seasons:
Spring: Add fresh herbs like chives or dill to the cheese mixture Summer: Serve with fresh tomato salsa or herb-infused olive oil Fall: Incorporate roasted garlic and add a sprinkle of smoked paprika Winter: Make them extra cozy with additional herbs and pair with hearty soups
Final Thoughts: Your New Go-To Appetizer
There’s something magical about homemade cheesy breadsticks that brings people together. Whether you’re hosting a casual get-together or need a quick side dish for dinner, these breadsticks deliver every single time. They’re proof that the best recipes are often the simplest ones – good ingredients, proper technique, and a little love.
The beauty of this cheesy breadsticks recipe lies in its reliability. Once you master the basic technique, you can customize the flavors to match any occasion or dietary need. From quick appetizers for guests to easy finger foods for entertaining, these breadsticks have become my secret weapon for any situation that calls for comfort food.
What I love most about sharing bite sized recipes like this is watching how they become part of your family’s traditions. These breadsticks aren’t just appetizers – they’re memory makers, conversation starters, and the kind of food that makes everyone feel welcome at your table.
Your Turn to Create Magic
Ready to make these irresistible cheesy breadsticks your own? I can’t wait to hear how they turn out in your kitchen! Every baker adds their own special touch, and I love seeing the creative variations my readers come up with.
Did you try this recipe? Please leave a rating and comment below – your feedback helps other home cooks and makes my day! Don’t forget to take a photo and tag us on social media @ForkfulRecipes with #CheezyBreadstickMagic. I love featuring your creations in my stories!
Want more easy appetizer recipes? Sign up for my weekly newsletter to get new party appetizers and bite sized recipes delivered straight to your inbox. You’ll also get access to my exclusive recipe collection and meal planning tips that make weeknight cooking so much easier.
Save this recipe for later by pinning it to your favorite Pinterest board – your future entertaining self will thank you! And if you love these breadsticks as much as my family does, be sure to share this recipe with your friends. Good food is meant to be shared!