
Introduction
Tired of dry, crumbly gluten-free biscuits that fall apart at the first bite? You’re not alone. Many home bakers struggle to achieve that perfect balance of flaky, tender texture when working with gluten-free flours. The good news? These light, buttery Gluten-Free Biscuits will rise beautifully and satisfy even the most discerning biscuit lovers.
As a professional baker who’s spent eight years perfecting gluten-free recipes, I’ve tested countless flour combinations and techniques to create biscuits that rival their wheat-based counterparts. This recipe isn’t just another disappointing substitute—it’s a celebration of what gluten-free baking can truly achieve.
In this guide, you’ll discover the science behind successful Gluten-Free Biscuits, essential ingredient tips, foolproof mixing methods, and troubleshooting advice to ensure perfect results every time.
Table of Contents
Why This Gluten-Free Biscuit Recipe Works
- Uses a precise blend of readily available gluten-free flours for proper structure
- Cold butter technique creates those coveted flaky layers
- Quick mixing method prevents tough biscuits
- Versatile for breakfast, dinner sides, or dessert shortcakes
- Freezer-friendly for make-ahead convenience
- No gritty texture or strange aftertaste common in gluten-free baking
Choosing the Right Flours
Best Flour Blend for Gluten-Free Biscuits
The foundation of perfect Gluten-Free Biscuits is the right flour combination. Unlike wheat flour, no single gluten-free flour can provide the structure, flavor, and texture needed for exceptional biscuits. For best results, use this blend:
- 1 cup white rice flour (provides structure)
- ½ cup tapioca starch (adds elasticity and chew)
- ¼ cup potato starch (creates tenderness)
- ¼ cup almond flour (contributes flavor and moisture)
Buying Tips
Look for flours specifically labeled “gluten-free” to avoid cross-contamination. Store-bought all-purpose gluten-free flour blends can work in a pinch, but check ingredients—those containing xanthan gum already will require adjusting the recipe.
Substitutions
- Brown rice flour can replace white rice flour (will give a nuttier flavor)
- Cornstarch can substitute for potato starch
- For nut allergies, replace almond flour with sorghum flour
Ingredients & Prep
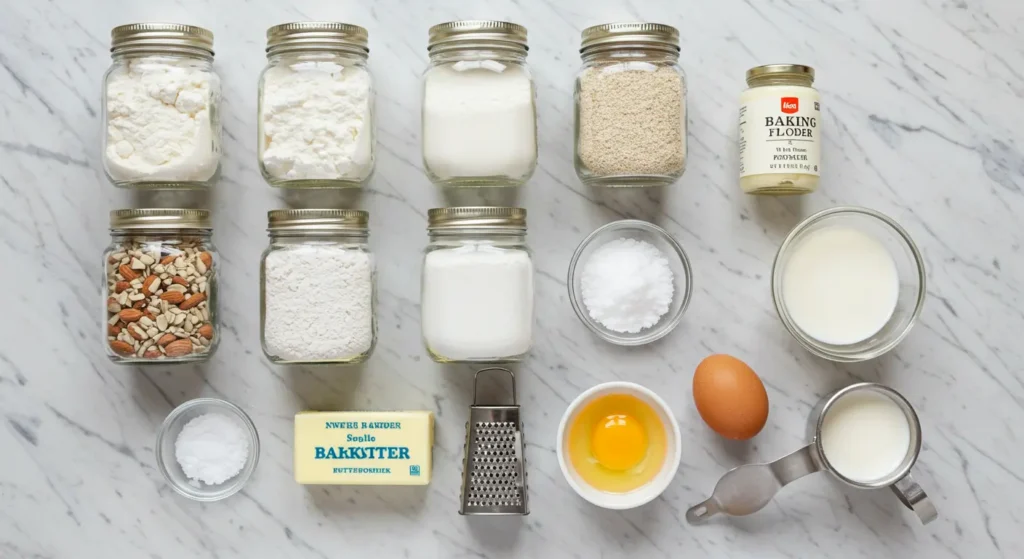
Biscuit Essentials
- 2 cups gluten-free flour blend (from above or store-bought)
- 1 tablespoon xanthan gum (omit if your blend contains it)
- 1 tablespoon baking powder (ensure it’s gluten-free certified)
- 1 teaspoon salt
- 2 tablespoons sugar (enhances browning)
- 8 tablespoons (1 stick) unsalted butter, very cold
- ¾ cup buttermilk, cold (plus 2 tablespoons if needed)
- 1 large egg
- 1 tablespoon apple cider vinegar (activates with baking powder for lift)
Cold Ingredients Strategy
For Gluten-Free Biscuits with maximum flakiness, all dairy ingredients should be ice cold. Some bakers even chill their mixing bowls and utensils in the freezer for 15 minutes before starting.
Pantry Staples
- Extra rice flour for dusting work surfaces
- Melted butter for brushing tops (creates golden-brown finish)
- Optional mix-ins: herbs, cheese, garlic powder for savory variations
Step-by-Step Cooking Instructions
Pre-Baking Prep
- Chill butter in freezer for 15 minutes, then grate using the large holes of a box grater
- Whisk together buttermilk, egg, and apple cider vinegar in a small bowl; keep refrigerated until needed
- Preheat oven to 425°F and line a baking sheet with parchment paper
- Prepare a clean, lightly floured surface for shaping biscuits
Mixing Method
- In a large bowl, whisk together all dry ingredients until well combined
- Add grated cold butter, tossing gently with fingertips until coated with flour mixture
- Create a well in center and pour in cold buttermilk mixture
- Stir gently with a fork just until mixture forms a shaggy dough (avoid overmixing!)
- Let dough rest for 5 minutes to allow flour to hydrate properly
Shaping and Cutting
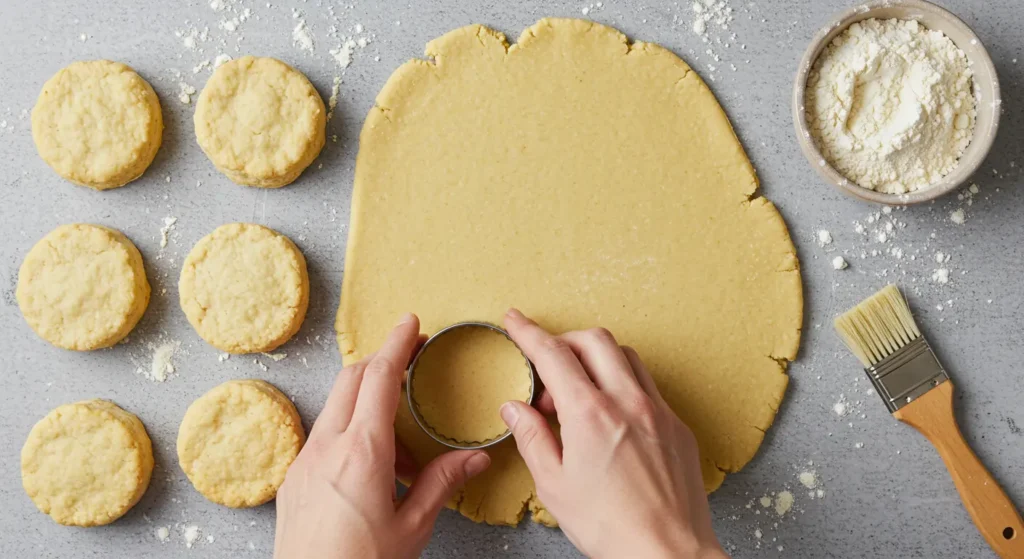
- Turn dough onto lightly floured surface (use rice flour)
- Pat gently into a rectangle about 1-inch thick (don’t use a rolling pin)
- Fold dough in thirds like a letter, then rotate 90 degrees
- Pat again to 1-inch thickness
- Cut with a 2½-inch biscuit cutter using straight down motion (no twisting!)
- Transfer biscuits to prepared baking sheet, placing them close together for higher rise
Baking Process
- Brush tops with melted butter
- Bake at 425°F for 15-18 minutes until golden brown
- Check doneness by looking for slight firmness when gently pressed
- Cool on baking sheet for 5 minutes before transferring to wire rack
Pro Tips for Perfect Gluten-Free Biscuits
Avoiding Dry or Dense Results
- Handle dough minimally—overworking develops xanthan gum too much, causing toughness
- Don’t skip the apple cider vinegar—it reacts with baking powder for essential lift
- If dough seems too dry, add buttermilk 1 tablespoon at a time
- For taller biscuits, chill shaped dough for 15 minutes before baking
Tool Recommendations
- Metal biscuit cutter with sharp edges (creates clean cuts that rise better)
- Pastry blender (alternative to grating frozen butter)
- Digital oven thermometer (gluten-free baking is sensitive to temperature accuracy)
- Silicone pastry mat with measurement guides for consistent thickness
Storage & Reheating
- Store at room temperature in airtight container for up to 2 days
- Freeze unbaked cut biscuits on a sheet pan, then transfer to freezer bag (keeps for 3 months)
- Bake frozen biscuits without thawing, adding 3-5 minutes to baking time
- Reheat by wrapping in foil and warming at 300°F for 10 minutes
Flavor Variations
Sweet Additions
- Cinnamon-Sugar: Add 1 teaspoon cinnamon to dry ingredients and sprinkle tops with sugar before baking
- Lemon-Blueberry: Fold in 1 tablespoon lemon zest and ½ cup dried blueberries
- Orange-Cranberry: Mix in 2 teaspoons orange zest and ⅓ cup dried cranberries
Savory Options
- Herb & Garlic: Add 2 tablespoons fresh chopped herbs and 1 teaspoon garlic powder
- Cheddar-Chive: Fold in ¾ cup shredded sharp cheddar and 3 tablespoons minced chives
- Everything Bagel: Brush tops with egg wash and sprinkle with everything bagel seasoning
Dietary Adaptations
- Dairy-Free: Use cold coconut oil instead of butter and non-dairy milk with 1 tablespoon lemon juice instead of buttermilk
- Egg-Free: Replace egg with 3 tablespoons aquafaba (chickpea liquid)
- Vegan: Combine both dairy-free and egg-free modifications above
Serving Suggestions
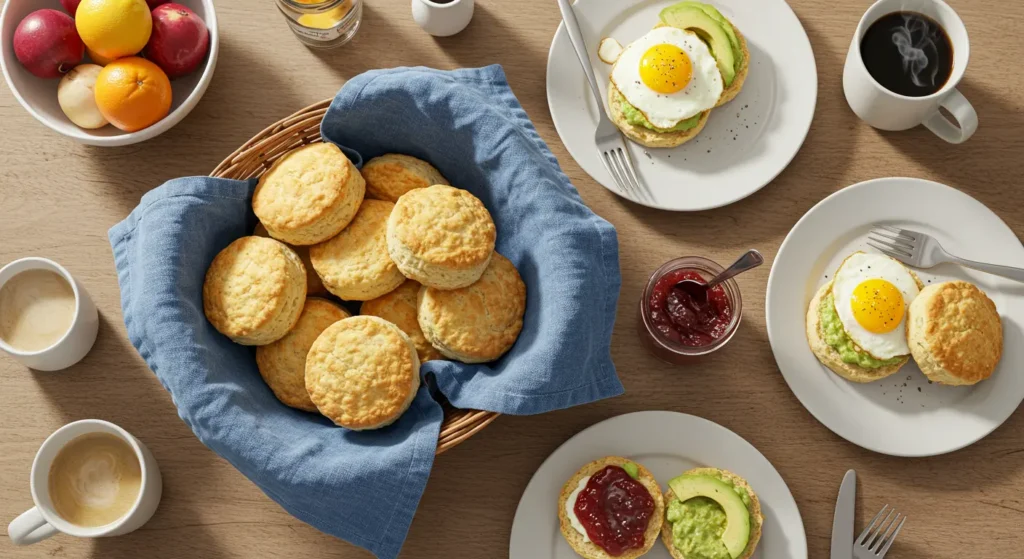
- Split and fill with scrambled eggs and bacon for breakfast sandwiches
- Serve alongside gluten-free gravy for a classic comfort meal
- Top with macerated berries and whipped cream for an easy shortcake dessert
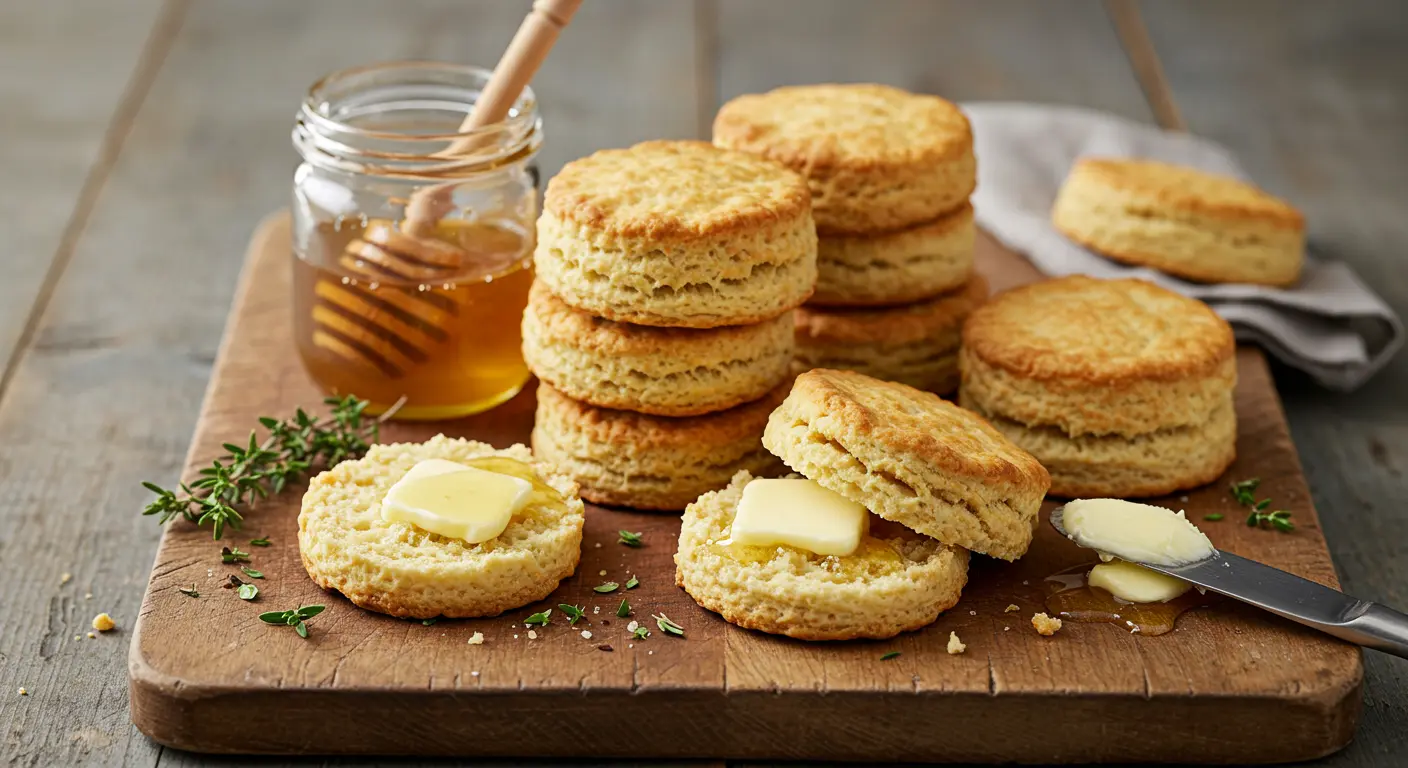
- Pair with honey butter for a simple, delicious treat
- Complement soups and stews as the perfect dipping companion
FAQs
Can I make the dough ahead of time? Absolutely! Prepare your gluten-free biscuit dough, cut into shapes, then freeze them on a parchment-lined baking sheet until solid (about 2 hours). Once frozen, transfer to airtight freezer bags where they’ll keep for up to 3 months. The beauty of this method is you can bake directly from frozen—simply add 3-5 minutes to the baking time. This makes fresh Gluten-Free Biscuits possible even on busy weekday mornings or for unexpected guests.
Why did my biscuits spread instead of rise? Temperature control is crucial for Gluten-Free Biscuits. When butter melts too quickly before the structure sets, spreading occurs instead of rising. Several factors could be responsible: your butter wasn’t cold enough, the kitchen was too warm, or the baking sheet was already hot. For tall, flaky biscuits, ensure all ingredients remain cold throughout preparation. Try chilling your cut biscuits for 15-20 minutes before baking, and always start with a room-temperature (not preheated) baking sheet.
How can I make these biscuits flakier? The folding technique creates those coveted layers in Gluten-Free Biscuits. For maximum flakiness, fold your dough in thirds (like a business letter) at least twice during the shaping process. Each fold creates distinct butter layers that translate to flaky goodness after baking. Remember to work quickly and gently—overhandling warms the butter and develops too much structure from the xanthan gum, resulting in tough rather than flaky biscuits.
Can I use a food processor to mix the dough? While a food processor saves time, it requires extra caution with Gluten-Free Biscuits. The high-speed blades can quickly overmix the dough, activating too much xanthan gum and resulting in tough biscuits. If using a processor, pulse the dry ingredients briefly to combine, add your cold butter and pulse just 5-6 times until you achieve pea-sized crumbs, then transfer to a bowl before gently mixing in your cold liquid ingredients by hand. This hybrid approach gives you control over the critical final mixing stage.
My biscuits turned out gummy inside. What went wrong? Gummy interiors typically result from moisture imbalance or insufficient baking. Gluten-free flours absorb moisture differently than wheat flour—sometimes slower and sometimes more aggressively. Let your mixed dough rest for 5-10 minutes before shaping to allow proper hydration. If your biscuits consistently turn out gummy, try reducing liquid by 1-2 tablespoons or extending baking time by 2-3 minutes. Also check your oven temperature with an oven thermometer—many run cooler than the setting indicates.
Can I substitute the xanthan gum with something else? Yes! Psyllium husk powder works wonderfully in Gluten-Free Biscuits at a 1:1 ratio with xanthan gum. Some bakers prefer the more natural origin of psyllium, and it creates a comparable binding effect. Ground flaxseed can also work (use 2 tablespoons instead of 1 tablespoon xanthan gum), though the texture will be slightly different and the flavor somewhat nuttier. If avoiding all gums and seed-based binders, try increasing egg to 2 eggs, though this will create a slightly different texture.
Why do I need vinegar in gluten-free biscuits? The apple cider vinegar serves two critical purposes: First, it reacts with the baking powder to create additional lift through acid-base reaction, compensating for the lack of gluten’s structure-building properties. Second, it helps tenderize the final product by inhibiting some of the binding proteins in gluten-free flours from becoming too rigid. Don’t worry—you won’t taste it in the finished biscuits! If you don’t have apple cider vinegar, lemon juice works equally well.
How do I know when gluten-free biscuits are fully baked? Gluten-Free Biscuits require different doneness indicators than traditional biscuits. Look for these signs: 1) golden brown tops and bottoms, 2) a slight firmness when gently pressed in the center, and 3) internal temperature of about 205°F if using a food thermometer. Unlike wheat-based biscuits, gluten-free varieties often need a few extra minutes to ensure the interior isn’t doughy. If in doubt, it’s better to slightly overbake than underbake—gluten-free biscuits tend to be more forgiving with extra time.
Conclusion
Mastering Gluten-Free Biscuits represents something greater than just another recipe—it’s reclaiming the joy of a food tradition many thought they had to abandon. Through hundreds of test batches and countless variations, I’ve discovered that achieving perfect texture isn’t about complicated techniques or exotic ingredients, but rather understanding the science of gluten-free flours and respecting the fundamentals of biscuit-making.
The cold-ingredient method, careful mixing, and proper flour blend create biscuits that rise proudly and break open to reveal steam and that characteristic flaky interior. Gone are the days of dense, crumbly disappointments that give gluten-free baking its undeserved bad reputation. These biscuits stand on their own merits—not as “good for gluten-free” but simply as excellent biscuits by any standard.
Remember that gluten-free baking is as much art as science. Your kitchen’s humidity, the temperature of your ingredients, even the brand of flours you choose can influence the final result. Don’t be discouraged if your first batch isn’t perfect—each attempt brings you closer to mastery. Take notes, adjust as needed, and soon you’ll develop an intuition for the perfect consistency.
The most rewarding moment comes when someone enjoys your Gluten-Free Biscuits without realizing they’re gluten-free. That moment of genuine appreciation, free from preconceived expectations, validates all your efforts. Whether you’re baking for yourself or loved ones with gluten sensitivities, you’re creating more than just food—you’re creating moments of normalcy and inclusion around the table.
Your Biscuit Journey Starts Now
Today is the perfect day to try these Gluten-Free Biscuits! Gather your ingredients, prepare your workspace, and embrace the process. Within an hour, you could be pulling a tray of golden, aromatic biscuits from your oven.
Share your baking results on social media with #PerfectGlutenFreeBiscuits and join our community of over 15,000 gluten-free bakers who’ve transformed their baking with these techniques. We love seeing your creations and hearing how these recipes have made a difference in your gluten-free journey.
Need help troubleshooting? Have a question not covered in our FAQs? Join our Gluten-Free Baking Facebook group where experienced bakers offer personalized advice and encouragement.
Ready to expand your gluten-free repertoire? Try our related recipes:
- Gluten-Free Buttermilk Pancakes: Light, fluffy breakfast perfection
- Savory Gluten-Free Herb Scones: The ideal dinner companion
- Southern-Style Gluten-Free Drop Biscuits: When you need biscuits in half the time
Remember, gluten-free baking isn’t about limitation—it’s about creativity, adaptation, and the universal joy of sharing delicious food with those you love. These biscuits are just the beginning of what’s possible in your gluten-free kitchen.
Happy baking!