

Introduction
Feeling overwhelmed about how to display all those grad party desserts for your upcoming celebration? You’re not alone. After catering dozens of graduation parties and designing countless dessert displays, I’ve discovered that the presentation of your treats can make even store-bought goodies look professionally crafted. This guide will walk you through creating 8 stunning sweet tables that will impress your graduates and guests alike, without requiring professional pastry skills or breaking your budget.
As a professional event planner with over 12 years of experience specializing in milestone celebrations, I’ve perfected the art of the dessert table. Whether you’re planning an intimate backyard gathering or a large venue celebration, these sweet table concepts adapt to any space or theme.
In this comprehensive guide, we’ll cover everything from selecting the right grad party desserts, arranging them effectively, coordinating with school colors, and creating Instagram-worthy displays that guests will remember long after the diplomas are framed.
Table of Contents
Why These Sweet Tables Work
- Creates a focal point that elevates your entire grad party atmosphere
- Uses budget-friendly desserts arranged in impressive ways
- Offers flexibility to accommodate various dietary needs
- Can be prepared partially or fully in advance to reduce day-of stress
- Encourages social sharing, creating lasting memories of your celebration
- Works for any graduation level—high school, college, graduate school
Choosing the Right Desserts
Classic Crowd-Pleasers
The foundation of successful grad party desserts is including items that appeal to different taste preferences. Consider offering:
- Bite-sized options (mini cupcakes, cake pops, chocolate-dipped strawberries)
- Nostalgic treats (cookies, brownies, Rice Krispie treats)
- Special dietary items (gluten-free, nut-free, vegan options)
School Spirit Selections
Incorporate your graduate’s school colors through:
- Color-coordinated frosting on cupcakes or cookies
- Candies in school colors (M&Ms, jelly beans, chocolate-covered pretzels)
- Decorated cake pops or macarons matching the school palette
Seasonal Considerations
For spring/summer graduations:
- Fruit tarts and berry desserts
- Lemon bars and citrus flavors
- Ice cream or gelato stations (with proper cooling)
Essential Supplies & Prep
Display Foundations
- Tiered cake stands (create height variation)
- Platters in various sizes and shapes
- Decorative boxes or books to create levels
- Table linens that complement your theme or school colors
Decorative Elements
- Small signs or food labels (especially important for dietary restrictions)
- Fresh flowers or greenery
- Graduation-themed props (small diplomas, graduation caps)
- Coordinated napkins, plates, and utensils
Pre-Party Planning
- Create a layout sketch of your sweet table one week in advance
- Prepare a shopping list categorized by store
- Schedule which desserts can be made ahead and frozen
- Plan for at least 2-3 dessert pieces per guest
Sweet Table #1: The Classic Cap & Diploma Display

Setup Instructions
- Cover a rectangular table with a tablecloth in the graduate’s school color
- Place a large graduation cap cake or cupcake tower as the centerpiece
- Arrange diploma-shaped cookies (rolled wafers with ribbons) in glass containers
- Create height variation with cake stands holding school-colored desserts
- Add small framed photos of the graduate throughout their school years
Pro Styling Tips
- Use mortarboard-shaped serving platters for smaller treats
- Roll napkins to resemble diplomas, secured with school-colored ribbons
- Incorporate yearbook photos or academic achievements as decorative elements
Sweet Table #2: The Dessert Grazing Table

Setup Instructions
- Use a large rectangular or L-shaped table arrangement
- Cover with kraft paper and write congratulatory messages
- Create “zones” with various grad party desserts flowing into each other
- Mix textures by alternating soft desserts (mousses) with crunchy options (brittle)
- Place dipping sauces (chocolate, caramel) in small bowls throughout
Pro Styling Tips
- Leave no empty spaces—fill gaps with small candies or nuts
- Add fresh fruits for color and to cleanse the palate
- Use wooden serving boards for a rustic, approachable feel
Sweet Table #3: The Dessert Wall Showstopper
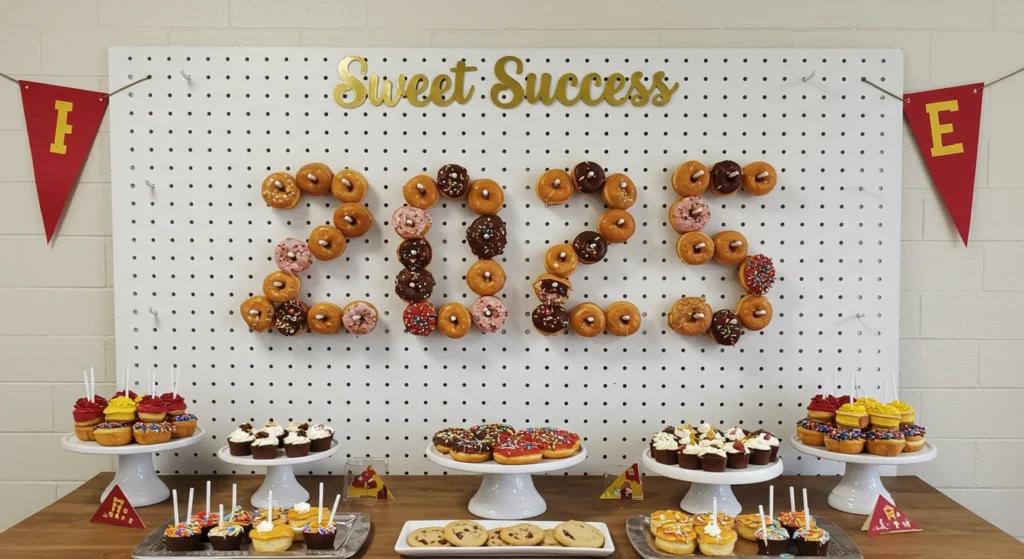
Setup Instructions
- Rent or DIY a pegboard or donut wall display
- Hang donuts, cookies, or cake pops in a pattern showing graduation year
- Place complementary grad party desserts on a table beneath the wall
- Add a “Sweet Success” or “Smart Cookies Graduate” sign above
- Incorporate school pennants or mascot elements
Pro Styling Tips
- Test weight capacity before hanging desserts
- Create a backdrop with a school-colored fabric or balloon arrangement
- Take photos of guests in front of the dessert wall for perfect social media moments
Sweet Table #4: The Interactive Sundae or S’mores Bar
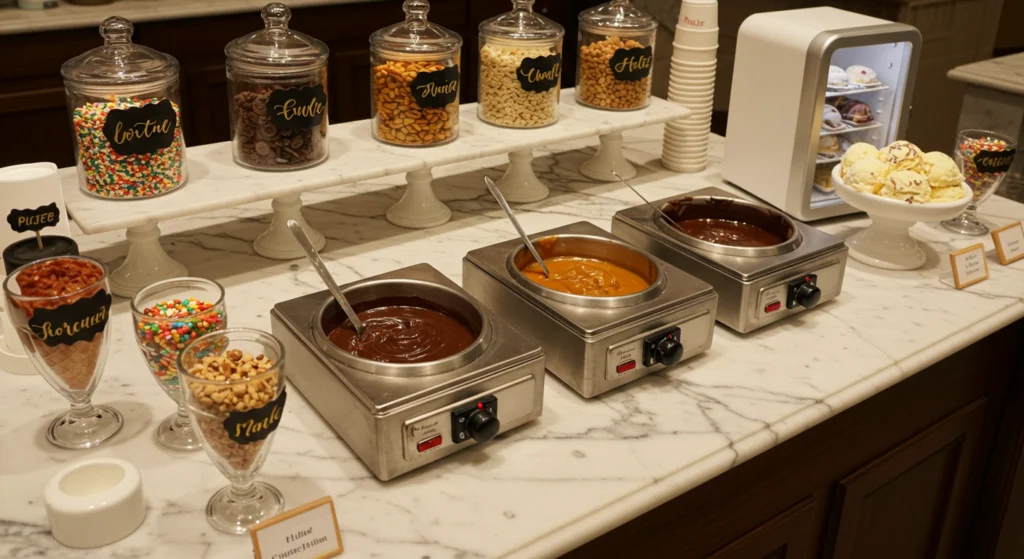
Setup Instructions
- Set up warming trays for hot fudge, caramel, or melted chocolate
- Arrange ice cream flavors in insulated containers (or use a mini refrigerator)
- Create labeled sections for toppings in glass containers
- Provide assembly instructions with suggested combinations
- Include pre-made examples for inspiration
Pro Styling Tips
- Freeze dessert bowls beforehand to keep ice cream from melting too quickly
- For outdoor parties, consider a s’mores station with portable fire pits
- Provide take-home containers for guests who want to enjoy treats later
Sweet Table #5: The Dessert Flight Experience
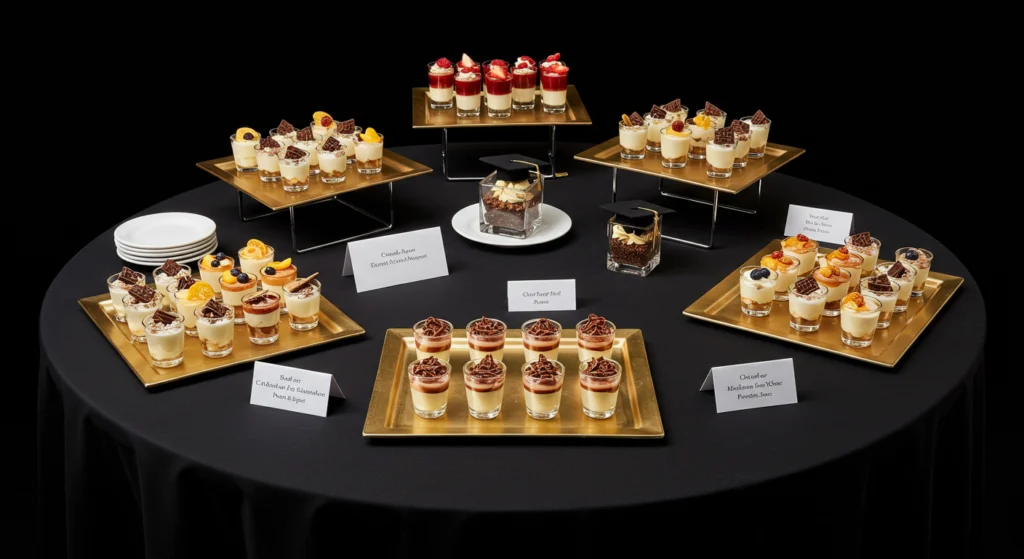
Setup Instructions
- Create mini-dessert samplers on small plates or in shot glasses
- Arrange in numbered “tasting stations” around a table
- Provide tasting cards for guests to rate their favorites
- Include a variety of textures and flavors (sweet, tart, creamy, crunchy)
- Group similar desserts on gold or silver trays
Pro Styling Tips
- Print small description cards explaining each dessert
- Include a “signature dessert” named after the graduate
- Add edible gold or silver accents for a sophisticated touch
Sweet Table #6: The Color-Coordinated Ombré Display
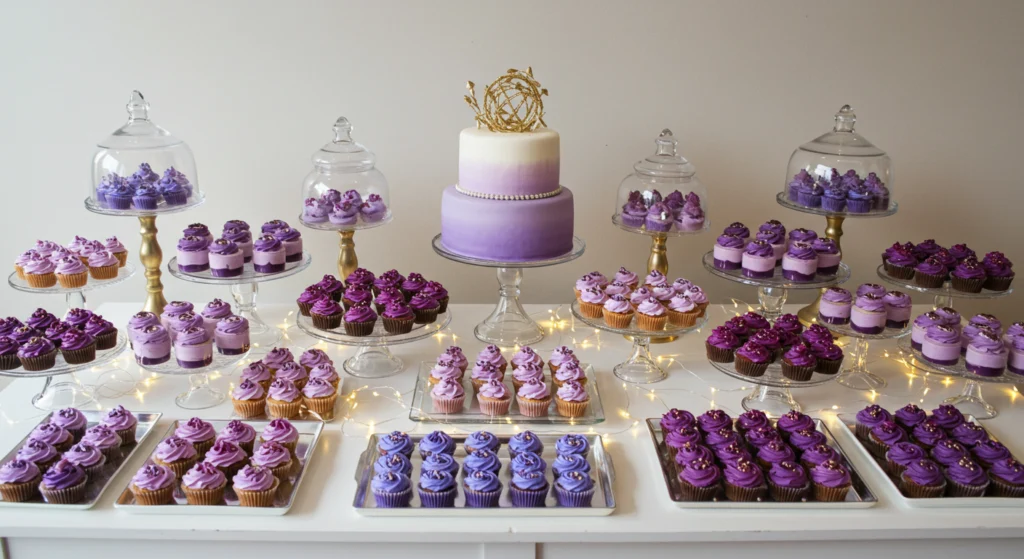
Setup Instructions
- Arrange grad party desserts in a gradient pattern matching school colors
- Start with lightest shade treats at one end, gradually transitioning to darkest
- Use clear containers to showcase the visual effect
- Place metallic accents between color sections
- Add height variation with cake stands and risers
Pro Styling Tips
- Use food coloring to create precise color matches
- Include naturally-colored foods that complement your palette
- Add battery-operated string lights under translucent platters for a glowing effect
Sweet Table #7: The Around-the-World Dessert Journey
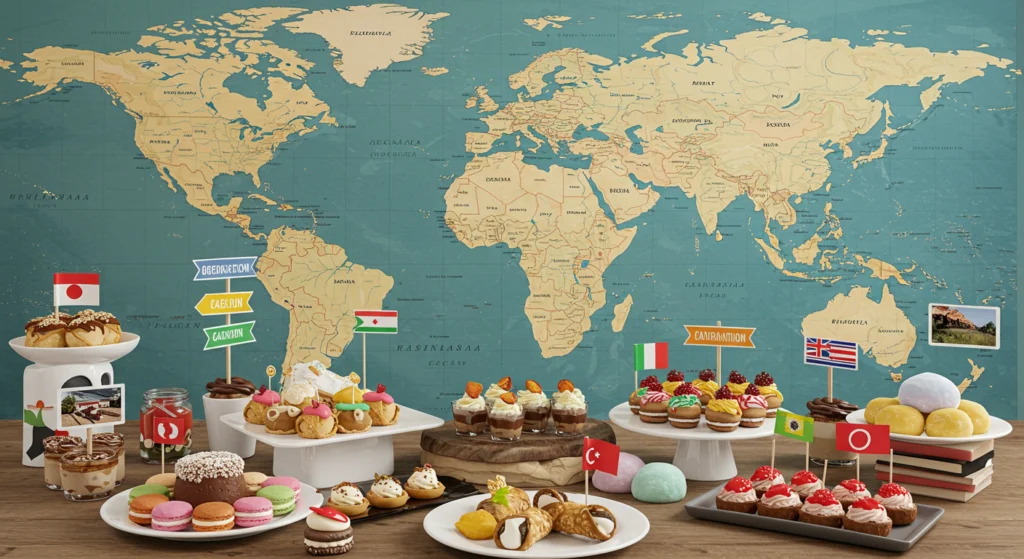
Setup Instructions
- Feature desserts representing places significant to the graduate
- Create small “destination” signs with photos or facts
- Group treats by region or country on separate platters
- Include the graduate’s favorites plus new discoveries
- Add small flags or travel-themed decorations
Pro Styling Tips
- Include a world map showing the dessert origins
- Provide recipe cards for guests to take home
- Tell the story of why each location is meaningful to the graduate
Sweet Table #8: The Late-Night Nostalgia Bar
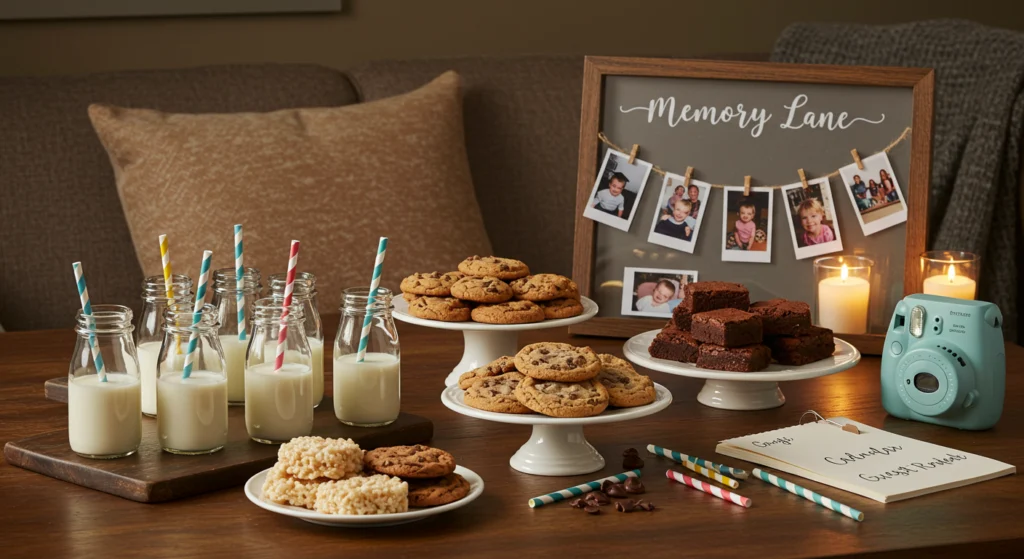
Setup Instructions
- Set up toward the end of the celebration as a second dessert offering
- Feature childhood favorites and comfort desserts
- Include milk cartons or coffee service
- Create a cozy lounge area nearby with photo albums
- Add a “Memory Lane” sign with baby photos to graduation pictures
Pro Styling Tips
- Include the graduate’s favorite childhood treats
- Set up a polaroid camera for guests to take late-night memories
- Provide to-go boxes for guests to enjoy treats on their journey home
Pro Tips for Perfect Sweet Tables
Avoiding Common Mistakes
- Don’t overcrowd your tables—allow breathing room between displays
- Consider temperature needs—keep chocolate away from direct sunlight
- Create a separate beverage station to avoid congestion
- Always include allergen information with clear signage
Tool Recommendations
- Quality serving platters in various sizes
- Cake stands at different heights
- Clear candy jars and decorative containers
- Small decorative signs and food labels
- Serving utensils for each dessert
Timing & Storage
- Set up tables 1-2 hours before the event
- Keep backup desserts refrigerated until needed
- Designate someone to refresh and maintain the table
- Plan for leftover packaging to send treats home with guests
Dessert Variations for Dietary Needs
Gluten-Free Options
- French macarons in school colors
- Rice Krispie treats with colored drizzle
- Fruit skewers with chocolate dipping sauce
- Meringue cookies or pavlovas
Dairy-Free Selections
- Coconut milk pudding cups
- Vegan chocolate-covered strawberries
- Sorbets instead of ice cream
- Dairy-free brownie bites
Nut-Free Alternatives
- Sugar cookies with royal icing decorations
- Sunflower seed butter cookies
- Jelly-filled thumbprint cookies
- Marshmallow crispy treats with sprinkles
Budget-Friendly Grad Party Desserts
- Mix homemade and store-bought items strategically
- Focus on presentation—simple desserts on beautiful platters look expensive
- Buy in bulk and customize with school-colored sprinkles or toppers
- Recruit friends and family to contribute signature desserts
- Use non-food decorative elements to enhance simple sweets
FAQs
How many desserts should I prepare per guest?
Plan for 2-3 dessert pieces per person, plus extra for unexpected guests or second helpings.
Can I set up sweet tables outdoors?
Yes, but be mindful of temperature. Avoid direct sunlight, use shade structures, and consider refrigeration needs for temperature-sensitive grad party desserts.
When should I start preparing desserts?
Begin planning 3-4 weeks ahead. Many desserts can be made 1-2 weeks in advance and frozen, while others should be prepared 1-3 days before.
How can I accommodate multiple dietary restrictions?
Create clear signage for common allergens, and keep certain desserts separated. Consider having a small separate table for special dietary needs.
What’s the best way to transport grad party desserts to the venue?
Invest in bakery boxes, plastic cake carriers, and coolers. Transport delicate items separately and assemble on-site.
Conclusion
Creating stunning sweet tables for your grad party desserts doesn’t require professional expertise—just thoughtful planning and creative presentation. Whether you choose a themed display centered around school colors or an interactive experience that guests will talk about for years, these 8 sweet table concepts can be adapted to any graduation celebration.
Remember that what makes these displays special isn’t just how they look, but how they celebrate your graduate’s unique journey and achievements. Don’t forget to take plenty of photos before guests arrive!
Ready to create your own Instagram-worthy grad party dessert display? Start gathering inspiration and planning your sweet table today! And don’t forget to check out our guides for graduation party games and meaningful graduation gifts that match your dessert theme.
Here’s a compelling 500-word call to action for your grad party desserts blog post:
Turn Your Graduation Celebration into a Sweet Memory
Your graduate’s journey deserves more than just a standard cake and punch reception. After years of late-night studying, countless assignments, and personal growth, this milestone calls for a celebration that reflects their unique accomplishment.
The dessert table isn’t just about satisfying sweet tooths—it’s the centerpiece of your celebration that guests will remember.
Imagine the pride on your graduate’s face when they see a stunning sweet table designed specifically to honor their achievement. Picture your guests’ expressions as they discover not just one, but eight different dessert experiences that tell your graduate’s story. These aren’t just desserts; they’re conversation starters, photo opportunities, and memory-makers.
But time is running out to create something truly special.
Graduation season approaches quickly, and venues, supplies, and specialty dessert orders fill up fast. The difference between a forgettable reception and an Instagram-worthy celebration often comes down to planning ahead. Don’t let this once-in-a-lifetime celebration become a last-minute scramble.
Here’s what you can do right now:
- Save this guide for reference as you plan your grad party desserts display
- Choose which of the 8 sweet tables best reflects your graduate’s personality and achievements
- Make your shopping list using our suggested supplies and ingredients
- Schedule your dessert preparation timeline working backward from the celebration date
- Share your plans with friends and family who might contribute to the dessert table
The best part? You don’t need professional skills or an unlimited budget. Our step-by-step instructions make creating these stunning sweet tables accessible to anyone willing to put in a little planning and creativity.
But don’t just take our word for it.
Hundreds of parents and graduates have used these exact sweet table concepts to create memorable celebrations. From intimate backyard gatherings to grand venue receptions, these flexible ideas scale to fit any graduation party.
“I never considered myself creative until I followed these dessert table ideas. Our guests couldn’t stop taking photos, and my daughter felt so special seeing all her favorites displayed so beautifully.” — Amanda, parent of a 2024 graduate
Your graduate deserves to feel celebrated in a meaningful way.
After all their hard work, give them a sweet send-off that honors their past achievements while celebrating their future potential. The memories created around your dessert table—the photos, the conversations, the moments of joy—will last long after the diploma is framed.
Start planning your stunning grad party desserts display today.
Download our free printable planning checklist and timeline to keep yourself organized. Then share your creation with us by tagging #GradPartyDesserts on social media—we feature the most creative displays in our monthly inspiration gallery!
Your graduate’s big day is approaching. Transform it from an ordinary reception into an extraordinary celebration with a sweet table they’ll never forget.
Ready to get started? Let’s create something amazing together!